1
What you need
eIDRent runs on an iPhone or an iPad with iOS or iPadOS 17 or newer. Nothing else is needed to get started: renting out, keeping a product list and taking items back all work without extra hardware.
On which devices
- iPhone — the iPhone XR and XS and everything after them, plus the iPhone SE of the second and third generation. The iPhone X, 8 and older can no longer run iOS 17.
- iPad — the iPad of the sixth generation and later, the iPad Air from the third, the iPad mini from the fifth, and every iPad Pro from 2017 on.
- Mac — any Mac with Apple silicon. The app runs there as an iPad app and reads the card just as well, over Bluetooth or with a USB-C reader.
Two devices join in if you want more
- A card reader to read the identity card. That can be a Bluetooth reader — the Zetes Sipiro M BT or the FEITIAN bR301BLE — or an ordinary eID reader in the USB-C port. Without a reader the app works fine; you simply skip the identification step.
- A receipt printer for the rental ticket: a thermal printer with a network or wifi connection, or an AirPrint printer.
Look in your cupboard or drawer first
Is there still an eID reader from the bank or the pharmacy? Plug it into the USB-C port — with a two-euro adapter if it has a USB-A plug — and check under More → USB reader whether the device sees it. If it is in the list you need buy nothing: the app uses it straight away. Any reader of the USB CCID class works, and nearly all of them are. Tested with the OneSpan Digipass 905, also sold as the VASCO DP905, at around € 13.
Or buy one on a cable
Nothing in the cupboard? Then the cheapest road is an ordinary eID reader on a cable. We tested the Sitecom MD-1002: a 60 cm cable with a USB-C plug, straight into the phone. Nothing to pair, nothing to charge, and the reader stays put on the counter while you insert the card.
- Indicative price — € 14.99 incl. VAT
- Connection — USB-C, straight into the port
- Tested on — iPhone and Mac
- On sale at — MediaMarkt, product code MD-1002
A second one we tested, which does the job just as well on iPhone and Mac: the Xssive CR02, also around € 14.99. It has no cable and clicks straight into the USB-C port. On sale at bol.com.
Or buy a Bluetooth reader
No cable, no adapter, and the port of your device stays free. We work with the Sipiro M BT 4.0, also sold as the FEITIAN bR301BLE. That is the model eIDRent was tuned with.
- Indicative price — € 85 excl. VAT
- Delivery — 1 to 2 working days
- Shipping — free from two devices
- Available at — eidshop.be
- In the box — the reader and a USB-A to USB-C charging cable, 24 months warranty
Sign your device in to iCloud if you plan to work with more than one iPhone or iPad later on. See chapter 13.
2
Try it out first
Before entering your own data, you can fill the app with sample material. That way you see straight away what a busy afternoon looks like.
- Go to MoreThe last tab, bottom right.
- Choose Load sample dataUnder the heading Try it out. The app fills up with a few go-karts, a quad and some running rentals.
3
Entering your products
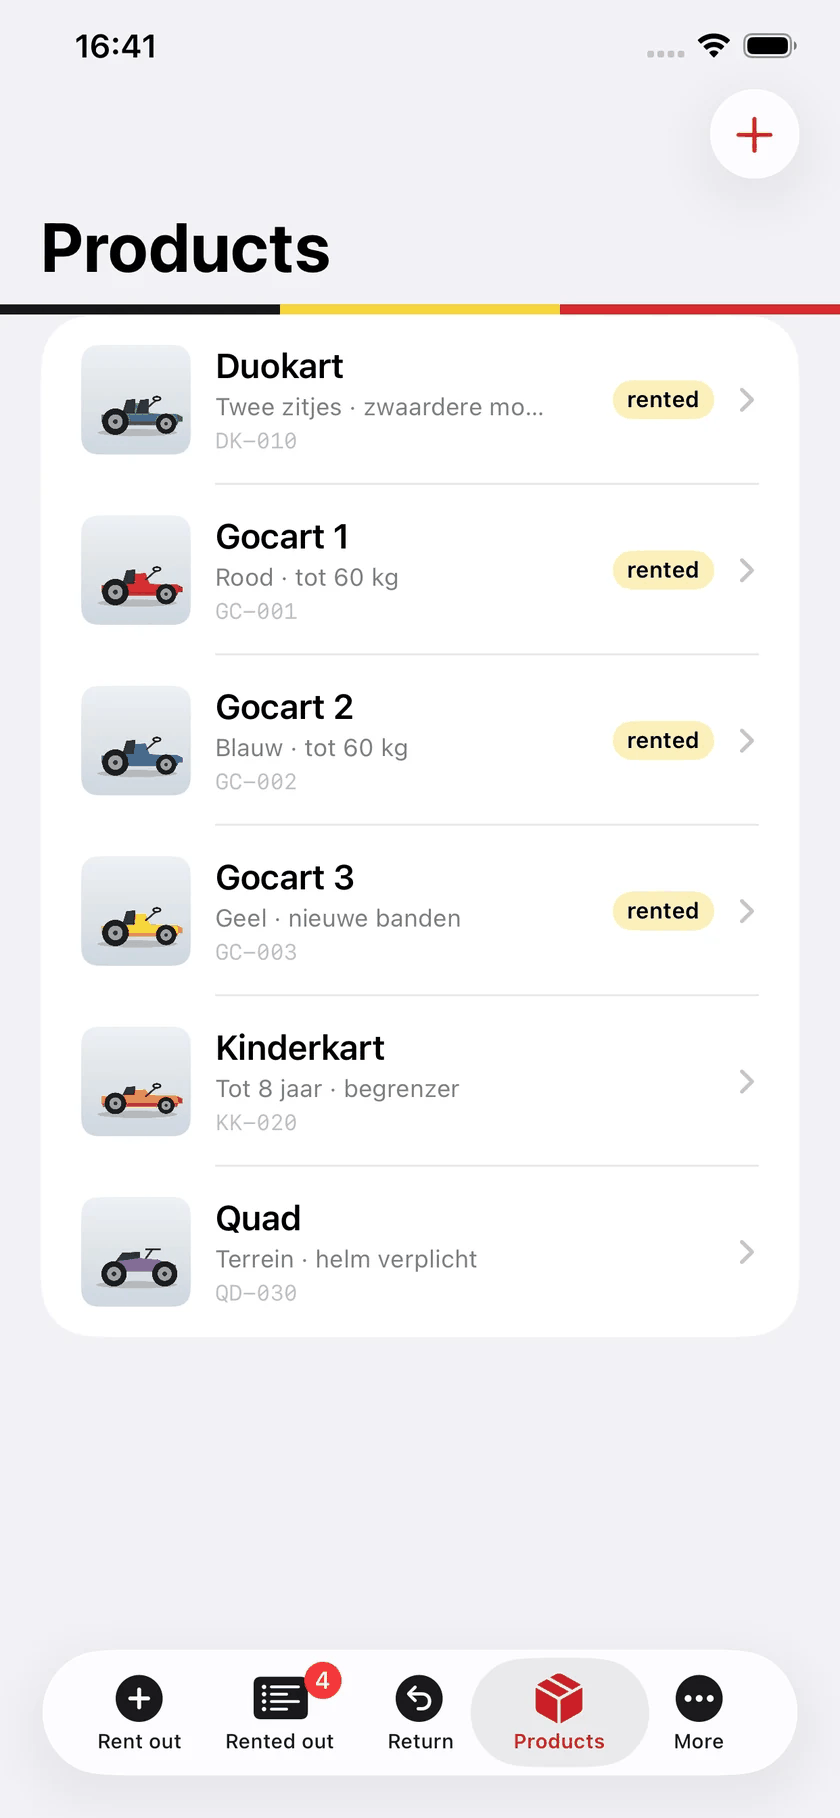
Everything you rent out is entered once. After that you simply pick it or scan it at each rental.
- Tab Products, then the plus buttonTop right.
- Give it a name„Go-kart 3” reads faster at the counter than „Kart”.
- Fill in the infoA short description: colour, condition, anything worth noting.
- Add a codeThe barcode or QR code stuck on the item itself. Scan it with the camera or type it in.
- Take a photoHandy when items look alike.
4
Starting a rental
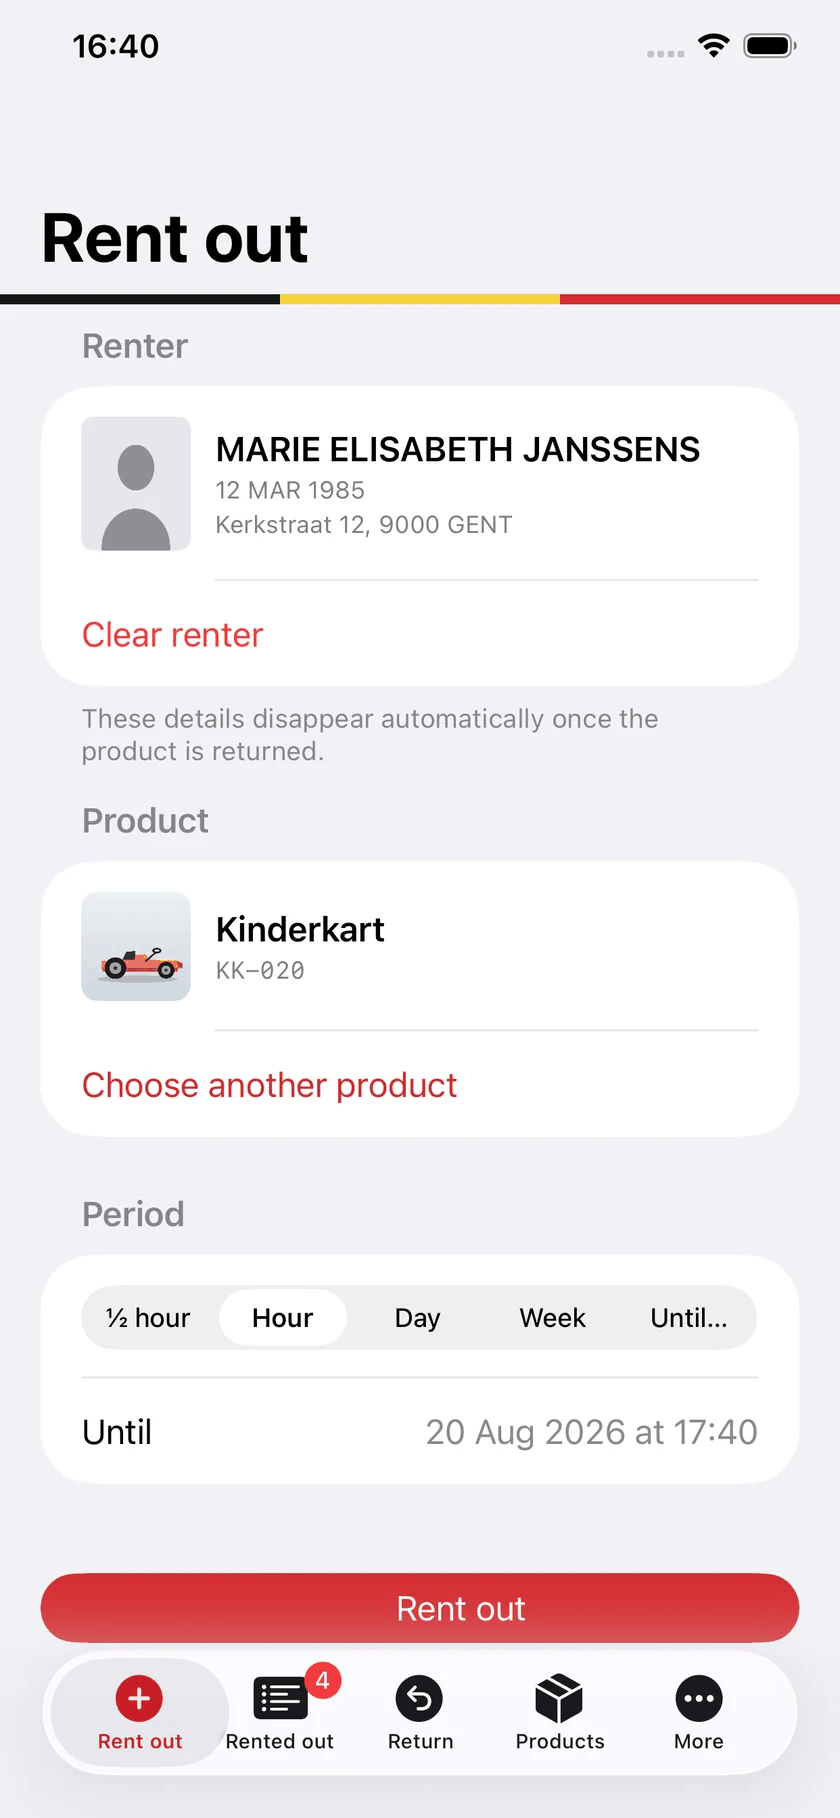
This is the screen you will use most: the Rent out tab. From top to bottom you work through three blocks.
- RenterTap Read eID to read the identity card. This is optional — skip it and the rental simply has no name attached.
- ProductScan code with the camera, or Choose from the list. Scan a code that does not belong to anything yet and the app offers to turn it into a product.
- PeriodHalf an hour, an hour, a day, a week, or Until… for an end time of your own. The end time appears right under your choice.
- PaymentCash, Card or Open. This one is required: the Rent out button stays greyed out until you have chosen. Nothing is preselected, because a default gets carried along all day without thinking and then your figures are worthless.
- Press Rent outThe rental is recorded. If a printer is set up and automatic printing is on, the ticket comes out immediately — no confirmation needed.
Whatever is out at that moment disappears from the list. So you cannot lend the same go-kart twice at once.
5
Connecting the card reader
The identity card is read by a separate Bluetooth reader. You connect it once; after that the app finds it again on its own.
- Switch the reader onIts light should blink.
- Go to More → Card readerThe app searches for readers nearby over Bluetooth.
- Pick your reader from the listFrom now on its name appears next to Card reader.
- Back to Rent outPut the card in the reader and tap Read eID.
The app takes the surname, given names, date of birth, address and portrait straight from the chip. That takes a few seconds.
Without pressing the button
Switch on More → Read automatically on insertion and the rental screen needs no tap at all: the moment the card goes into the reader, the app reads it. At a busy counter that saves a step with every customer.
- It only works on the Rent out screen. On Products or Return nothing happens — a card that lands in the reader there fills in no renter.
- It only works while nobody has been filled in yet. A card left sitting in the reader is not read over and over, and a name you typed yourself is never overwritten.
- The switch is off to begin with. Reading automatically means a card someone merely puts down is read too, and that should be the business's own choice.
If something goes wrong, More → APDU traffic shows the full conversation between the app and the card. It is technical, but it is exactly what someone needs to help you.
No reader yet? More → Buying a card reader tells you which model we use, what it costs and where to get one. Chapter 1 repeats it.
6
The overview: what is out
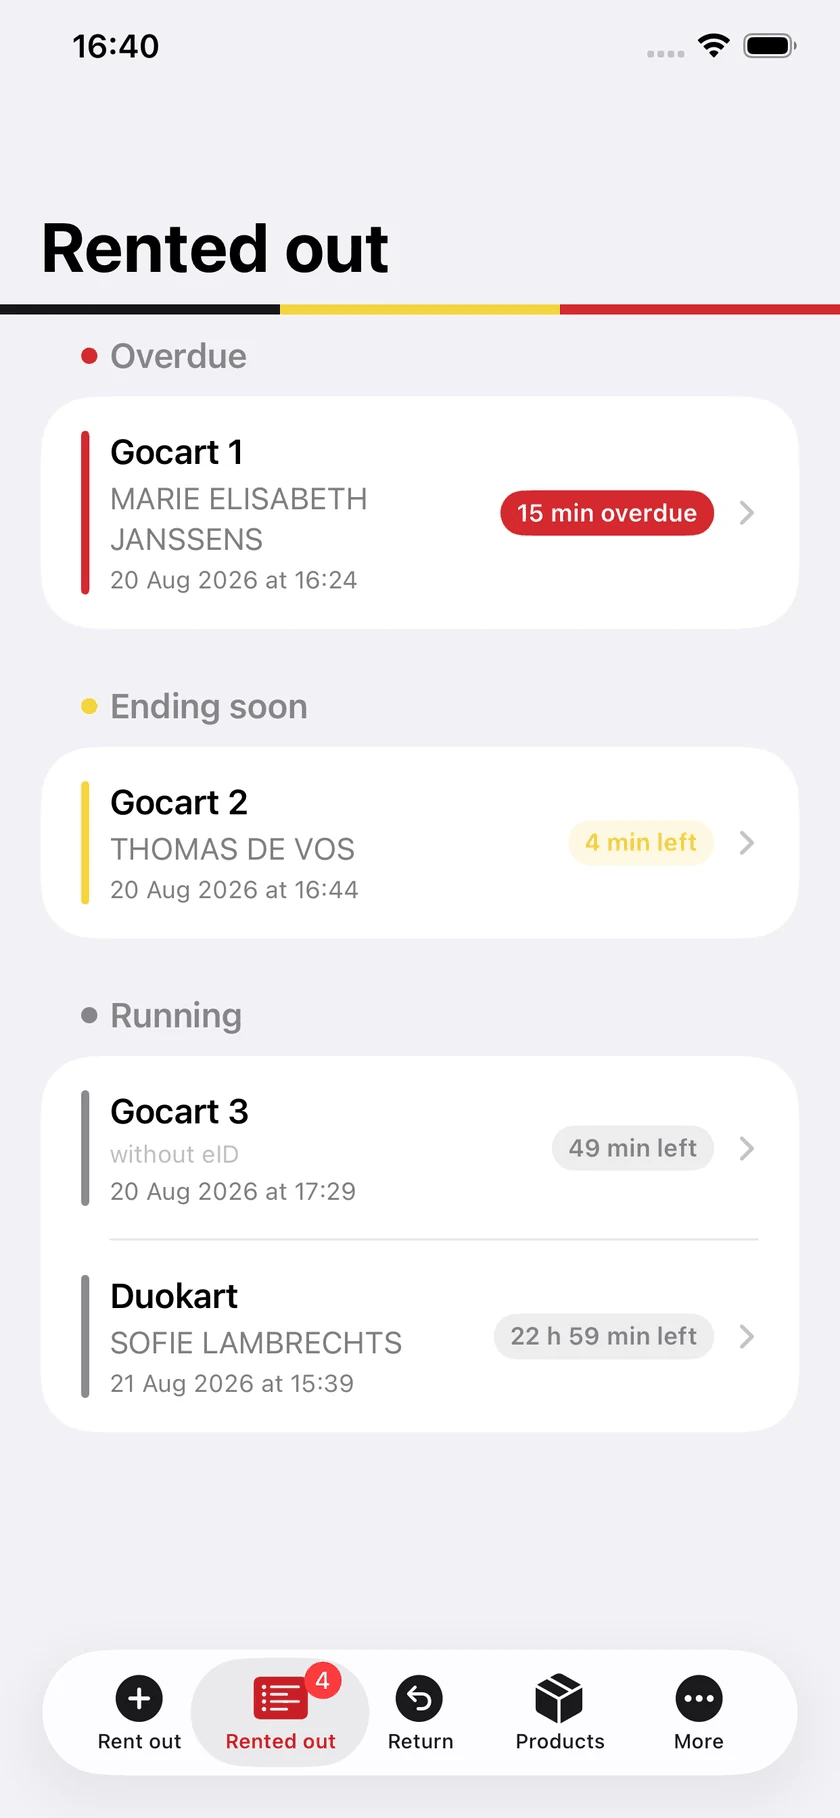
The Rented out tab is your dashboard. The colour tells you everything:
- Red — overdue. At the top, because that is what needs solving.
- Yellow — ending within the half hour. Time to keep an eye out.
- Grey — running, nothing the matter.
Tap a rental for the full picture: product, period, the renter with their portrait, and the QR code for this rental. That is also where Print ticket again and Product returned live.
7
Taking an item back
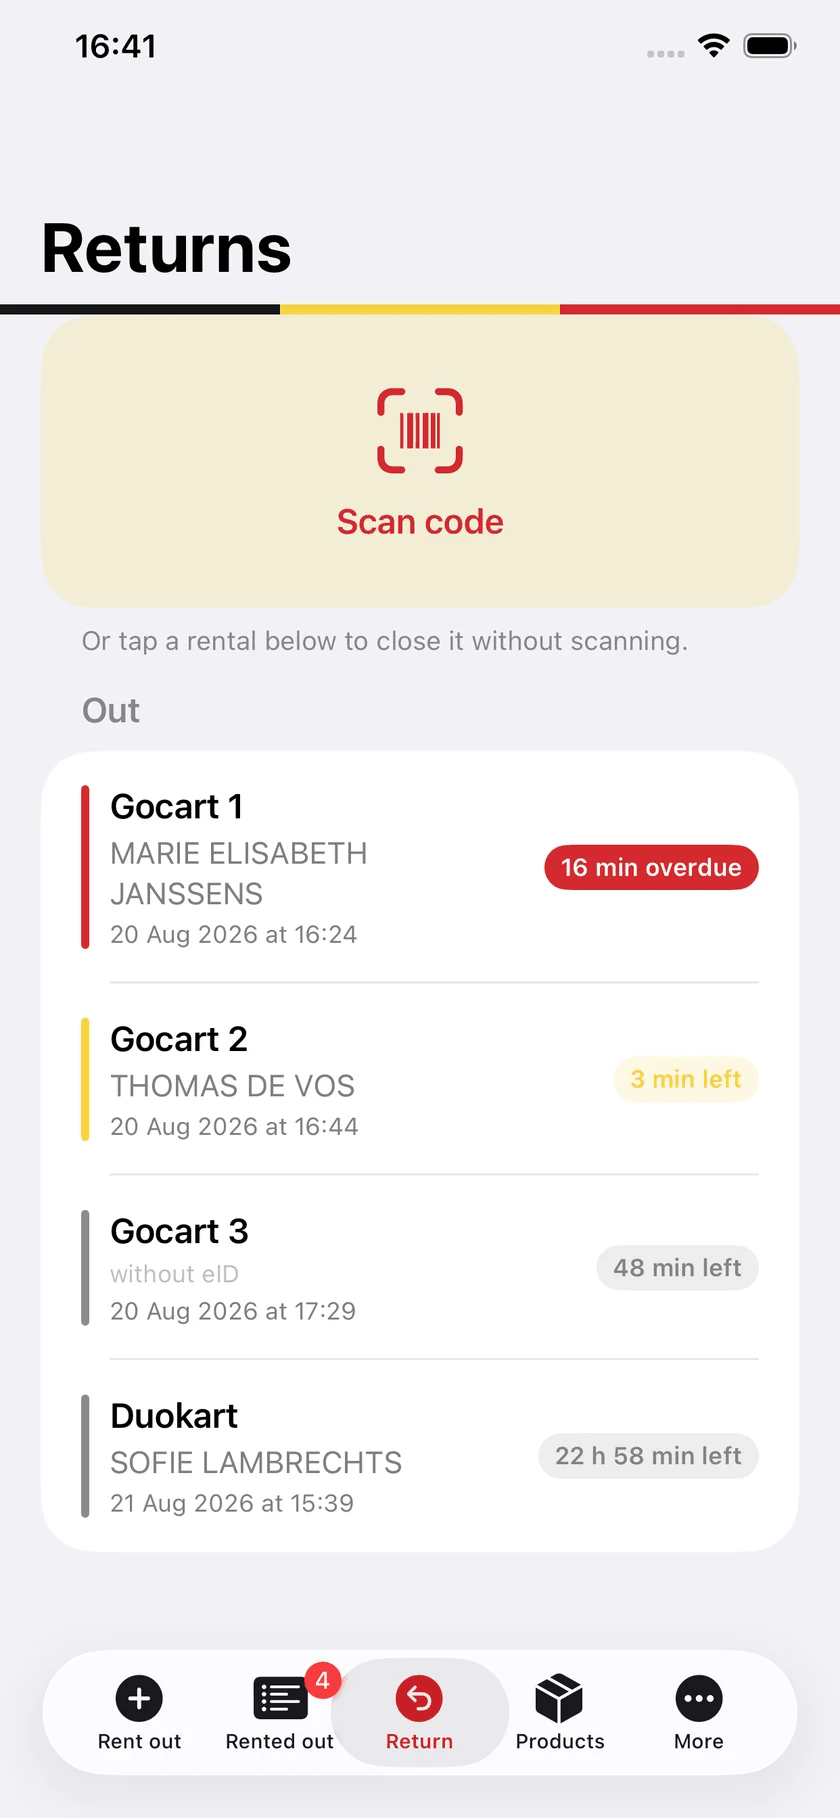
Tab Return, then Scan ticket or code. The camera recognises two things:
- The QR code on the rental ticket. It points to one particular rental. Even with three identical go-karts out, the right one closes.
- The barcode on the item itself. Handy when the ticket has gone missing.
If scanning will not work, simply tap the rental in the list below. Or use Enter code manually in the scanning screen.
Every return does the same thing: the rental moves to the history and all the renter's data — name, date of birth, address, card number, portrait — is erased. What remains is which item, from when until when.
8
Your company details and the ticket
Go to More → Company & ticket. What you enter here appears on every rental ticket.
- Logo — pick an image from your photo library. A receipt printer prints in black and white, so a logo with crisp lines comes out far better than a photo full of greys.
- Name, street, postcode and town, phone — these lines sit under the logo.
- Email address — where the daily report goes by default. See the chapter on payment and the daily report.
- Closing line — optional, at the bottom of the ticket. Your opening hours, for instance, or a short rental condition.
The ticket shows what the item is, when the rental starts and ends, how long it runs, and at the bottom the QR code for the return. The renter's name is deliberately left off, so no personal data leaves the building on paper.
9
Setting up the printer
There are two roads to paper. Set up both and the receipt printer wins.
A receipt printer on your network
This is the cheapest and the most dependable route. An ordinary thermal receipt printer with wifi or a network cable will do; it costs a fraction of an AirPrint model and prints the QR code more sharply, because the printer draws it itself.
- Find the printer's IP addressIt is usually on the test page it prints when you switch it on, or in its own menu.
- Enter it under Printer IP addressFor example 192.168.0.50.
- Leave the port at 9100That is the right one for almost every receipt printer.
- Choose the roll width58 or 80 mm — have a look at the roll that is in there.
- Press Print a test ticketA ticket with made-up details comes out.
An AirPrint printer
Without a receipt printer on the network, AirPrint will do. Tap Printer at the bottom of the screen and pick one from the iOS list. The ticket is then printed as a laid-out page rather than as a receipt.
Automatic or not
With Print automatically on, every new rental produces a ticket by itself, with no screen in between. Switch it off and you only print deliberately, through Print ticket again on a rental's screen.
10
Giving the printer a fixed address
The app looks for your receipt printer at its IP address. The printer borrows that address from your modem — this is called DHCP — and a loan runs out. After a power cut, a modem restart or a long weekend the printer may come back on a different address. Nothing prints any more, and nothing is broken. Pin it down once and you are rid of it.
This chapter uses the Star TSP100 as its example, the receipt printer you meet in most shops. Another make will name its buttons differently, but the road is the same.
Step 1 — fetch the self-test page
Everything you need, the printer prints for you.
- Switch the printer offWith the switch, not by pulling the plug.
- Hold the FEED button downThe paper-feed button on the front.
- Switch it on again and let go only when it starts printingA test page rolls out, sometimes two.
On that page, look for Current IP Parameters Status. It carries the three things you need: the IP address the printer has right now (say 192.168.0.147), the subnet mask (usually 255.255.255.0) and the gateway — the address of your modem. A little higher sits the MAC address: twelve characters, for example 00:11:62:1A:2B:3C. That is this printer's fingerprint and it never changes.
Step 2 — pick your road
There are two ways to pin the address down. The first is the tidy one: you tell the modem that this printer must always get the same address. The second you set in the printer itself. Which one you take depends on your modem.
- Proximus b-box — reservations on the modem work. Take road A.
- Telenet — Telenet's modems have no reservations at all. Take road B.
- Your own router (Fritz!Box, Ubiquiti, pfSense, Synology…) — all of them can do this. Road A.
Road A — a reservation on the modem
The printer simply stays on DHCP; the modem hands it the same address every time. Nothing changes inside the printer, and that is the advantage: move it to another network later and it still works there.
- Open the modem in a browserType the gateway address from the test page into the address bar, for example http://192.168.1.1. On a Proximus b-box that is 192.168.1.1; the username and password are on the sticker underneath.
- Find the DHCP settingsOn the b-box: My modem → DHCP. On another router it is called DHCP, LAN, Devices or Network settings.
- Add a static addressPick the device with your printer's MAC address from the list and give it the address you want. Take the address the printer already has and you need change nothing else.
- Save, then restart the printerOff and on again. Print another test page and check that the address is right.
Road B — a fixed address inside the printer
Here the printer decides its own address and stops asking the modem. This works with every modem, Telenet included. There is one rule you must not break: choose an address outside the range the modem hands out itself. Break it and the modem may give that same address to a phone a month later, leaving two devices quarrelling over one number — a fault that shows up now and then and turns your hair grey.
That range is in the modem, with the DHCP settings: a start and an end address. On Telenet it is often 192.168.0.100 to 192.168.0.199. Then choose something below it, say 192.168.0.50. If you cannot find the range, take a low number between .10 and .49 — that is nearly always safe.
How you enter it depends on how old your printer is. Try the browser first; no page means the second road.
A newer printer (TSP100III, TSP100IV)
- Type the current IP address into a browserFor example http://192.168.0.147.
- Sign inUsername root, password public. Change that password afterwards; it is the same on every printer of this make.
- Go to IP ParametersSwitch on Static and fill in your chosen address, plus the subnet mask and gateway from the test page.
- Save and restartThe printer comes back on its new address.
An older printer (TSP100LAN, TSP143LAN)
That one has no web page, only a text menu over telnet. On a Mac, open Terminal (Applications → Utilities) and type:
telnet 192.168.0.147— with your own printer's address.- Sign in with root and public.
- Choose IP Parameters, set it to Static and fill in the address, subnet mask and gateway.
- Save and let the printer restart.
brew install telnet, or use Star's free setup utility on a Windows PC.Step 3 — put the address in the app
More → Company and ticket → Receipt printer: enter the fixed address, leave the port at 9100, pick the roll width and press Print test ticket. Paper comes out, you are done.
If it still will not work
- Is everything on the same network? A guest wifi is a different network, even though it comes out of the same modem. The iPad has to be on the ordinary one.
- Does the printer answer? On a Mac:
ping 192.168.0.50in Terminal. An answer means the address is right and the trouble is elsewhere. - Is port 9100 open?
nc -z -G 2 192.168.0.50 9100says succeeded when the printer is listening. - Does the app have permission? Settings → eIDRent → Local Network must be on. Without it the app may not address a single device on your network.
- Nothing comes out and no error appears? Set the printer language to Star in the same settings.
11
Language, history and clearing up
Language
More → Language: Dutch, French or English. It is independent of your device language, so a French-speaking colleague can work on the same phone.
History
More → Returned shows every closed rental. Swipe left to delete one, or use Clear all at the top right. There is no personal data left in there — that was erased at the return.
Erasing everything
More → Try it out → Erase all data empties the app completely: products, rentals, history. Your company details and your printer setting stay put.
12
Payment and the daily report
With every rental you record how it was paid. That is one tap, but it is what makes your history useful afterwards: you see not only what went out, but what came in.
The three states
- Cash — paid in cash.
- Card — paid by debit or credit card.
- Open — taken along, not paid yet. A deliberate choice, not the same as forgetting to fill it in.
An open payment stands out: it appears in red in the list of current rentals and in the history, with the word next to it. So you see at a glance who still has to pay, without opening a single row.
Putting it right afterwards
If the customer pays later, tap the rental — in the overview or in the history — and set the payment to Cash or Card on the detail screen. That works even after the item has come back.
Emailing the daily report
More → Returned → Email daily report turns one day into a PDF and prepares an email. Handy for your accountant, or simply to read back your own day.
- Pick the dayIt starts on today, with the date written out. Another day is chosen below; later than today is not possible.
- See what is in itThe screen shows how many rentals that day has and how they were paid. If nothing was rented that day the button stays greyed out — you do not send an empty sheet out the door.
- Check the addressThe address from your company details is already filled in. You can change it here; what you type is remembered.
- Tap Email as PDFThe iOS mail window opens with subject, message and the PDF attached. You press send.
The report counts the rentals that started on that day, not the returns. What went over the counter that day is what you want to know, and that is when payment happens. A go-kart that went out on Friday and came back on Saturday belongs to Friday.
13
Working with your whole team at once
Run off your feet? Put more people on it. At the counter, on the car park or in the warehouse, your staff enter rentals at the same moment, in the same list. Nobody waits for anyone else to finish.
- Enter at the same time — counter, car park and warehouse at once. Every rental lands in the same list.
- There for everyone — what one person enters is on someone else's screen seconds later. Returns included.
- Not at the office? — handle everything from your iPhone: at the business, at home or on the road.
How to set it up
Sign all your devices in with the same Apple Account. Products, rentals and history then appear on each of them. This runs through the iCloud of that Apple Account: there is no server of ours, and we cannot reach your data.
One purchase covers all your own devices. If your staff use their own Apple Accounts, that is a separate purchase per account; for a business, Apple Business Manager is the tidiest route.
14
What happens to personal data
- The Belgian national register number is never stored. The app reads it from the card but saves it nowhere.
- The renter's data is erased automatically at the return.
- The ticket carries no name, only the item and the times.
- The data sits on your own device and in the iCloud of that Apple Account. Nothing is sent to us, and the app contains no analytics and no advertising.
- The daily report carries no name: only item, time, duration, payment and status. Sending it means no personal data leaves your device.
- The payment method is kept after the return. It belongs to the transaction, not to the person, and cannot be traced back to anyone.
As the rental business you are the data controller for your customers' data. The full privacy policy is on a separate page, linked at the bottom.
15
When something will not work
No card reader found
Is the reader on and is its light blinking? Is Bluetooth on for your device? Otherwise go back to More → Card reader and pick it again.
The card is not being read
Push the card all the way into the reader and try again. The app makes several attempts by itself, so give it a few seconds. If the reader had just fallen asleep, the second attempt usually succeeds.
No ticket comes out
Run through the list: is the printer on, is it on the same wifi network, is the IP address right, and did you give iOS permission for the local network? Test with Print a test ticket — it tells you at once whether the printer answers.
Scanning does not work
Check that eIDRent has access to the camera in your device settings. On older devices scanning is sometimes unavailable; use Enter code manually at the bottom of the scanning screen instead.
A product is missing from the list
Then it is probably already out. Have a look under Rented out: items on loan disappear from the list until they are back.
Anything else
Write to info@filemakerlab.be. Mention which device you are using and what you were doing exactly — that saves us guessing.